
Introduction
This blog post is designed to serve as a comprehensive guide for developers looking to apply mutation testing into their Angular application.
If you are that developer, you will be able to carry out mutation testing with ease by following the working configurations and examples provided below.
If you just happened onto this tutorial, you will gain a decent understanding of mutation testing. Please see here for a definition of the mutation test.
Note: For Angular, it is
Strykersoftware to provide mutation testing capabilities.
Configuration
Install
The first step is to install stryker-cli to initiate the Stryker project inside the Angular application.
Run the following command to install Stryker-cli.
npm install --global stryker-cli
Initialize Stryker project
Run the following command to configure the Angular project with the Stryker mutation testing framework. To do so, please move into your application’s home directory.
stryker init
This will create the following file in the Angular application root folder.
striker.conf.json
{
  "$schema": "./node_modules/@stryker-mutator/core/schema/stryker-schema.json",
  "_comment": "This config was generated using 'stryker init'. Please see the guide for more information: https://stryker-mutator.io/docs/stryker-js/guides/angular",
  "mutate": [
    "src/**/*.ts",
    "!src/**/*.spec.ts",
    "!src/test.ts",
    "!src/environments/*.ts"
  ],
  "testRunner": "karma",
  "karma": {
    "configFile": "karma.conf.js",
    "projectType": "angular-cli",
    "config": {
      "browsers": [
        "ChromeHeadless"
      ]
    }
  },
  "reporters": [
    "progress",
    "clear-text",
    "html"
  ],
  "concurrency": 2,
  "concurrency_comment": "Recommended to use about half of your available cores when running stryker with angular",
  "coverageAnalysis": "perTest"
}
Example
Let’s have a look at a very simple unit test example.
mutation.example.ts
export function validateName(name: string): boolean {
    if (name == null || name.length < 4) {
        return false;
    }
    return true;
}
and 100% code coverage unit test for the above method is
mutation.example.spec.ts
import { validateName } from "./mutation.example";

describe("Mutation test example.", () => {

    it("Should return false for short name.", () => {
        let name = "abc";
        expect(validateName(name)).toBeFalse();
    });

    it("Should return true for correct name.", () => {
        let name = "Benjamin";
        expect(validateName(name)).toBeTrue();
    });
});
Code coverage will be
TOTAL: 8 SUCCESS

=============================== Coverage summary ===============================
Statements   : 100% ( 11/11 )
Branches     : 100% ( 3/3 )
Functions    : 100% ( 3/3 )
Lines        : 100% ( 9/9 )
================================================================================
Everything appears to be correct to an impulsive developer, but when we run a mutation test against it, we discover a hidden flaw. The mutation test reveals the other side of the story.
mutation test report
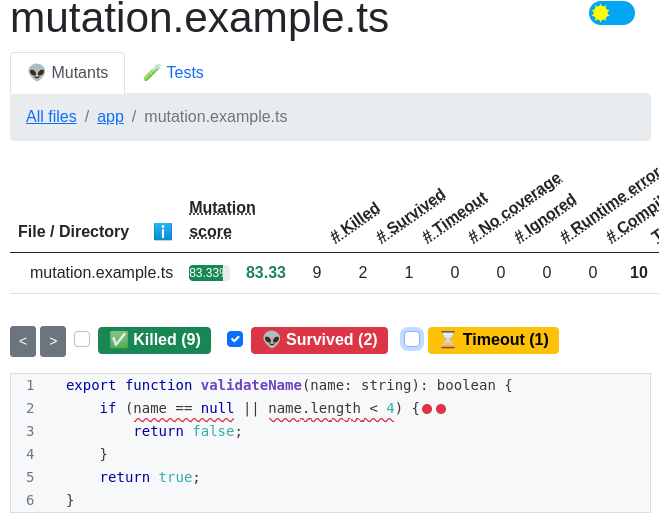
Red dots indicate the surviving mutations.
How it works
Let’s see how mutation tests work.
export function validateName(name: string): boolean {
-    if (name == null || name.length < 4) {
+    if (false || name.length < 4) {
        return false;
    }
    return true;
}
So it replaces the name == null condition statement with a false statement and test cases run against this modified code. If the test passes, then it states that a mutation exists. Our job is to remove that mutation by adding a unit test case that handles such a scenario.
If we study the unit test cases and source code, we can see that there is no use of name == null, hence we must write a test case to pass an empty string and test it.
Update Unit Test Cases
The following is a unit test case to tackle the empty name condition check.
it("Should return for empty name", ()=>{
      let name = null;
      expect(validateName(name)).toBeFalse();
  });
Next, Run following command
stryker run
And now the report will be like
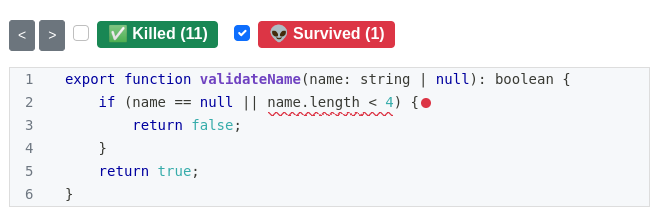
Report shows name == null mutation is removed.
What is Mutation Testing
Mutation testing is specialised software that improves unit testing in any programming language. Though it does not improve code coverage, it does identify the types of edge cases that we generally overlook.
How does it work? Well, in a nutshell, it changes the application code at run time before unit tests are executed and those test cases are run against the modified code.
What does it change in code? it changes many things for example
If you have a condition statement like a > b then it changes it to a < b.
Now your unit tests should handle such scenarios. If the test case fails, then it implies that the test case has eliminated the mutation from the code. If it doesn’t, then there is a need for improvement in test cases.
Stryker Mutation Framework
As mentioned earlier, every language has specialised software for mutation testing. For Angular, it is Stryker software. It is an open source project and it supports more than 30 mutations. It also provides a very convenient report, which will help to improve test cases. For more information, go to its official website.
Conclusion
Mutation testing can also be supported by a sophisticated framework such as Angular. Though it reduces productivity since mutation test execution is slow, but it improves application sustainability, which we need in the long term.
This blog post uses following softwares
- Angular: 13.2.7
- Node: 16.14.0
- Typescript: 4.5.5
- Stryker: 6.1.2
Source Code
You can find source code used in this tutorial on Github page.